Soul 网关源码分析(二)divide, rewrite 插件
在上一节里我们编译好了 Soul 网关的源码,今天我们从rewrite插件开始学习如何对服务进行代理并重写路径。
首先我们用Python写一个简单的Flask应用:
1 | from flask import Flask |
启动服务后,我们可以看到现在设置的路径为:
1 | http://127.0.0.1:5000/foo/bar/ |
尝试使用 curl 访问对应的接口:
OK,服务正常。图床
我们在 soul-admin 选择 rewrite 插件,点击添加选择器:
在弹出的对话框中输入:
点击确认后,通过 Chrome debug 可以捕获到前端发起的三个请求,分别是:
- /selector
- /selector?pluginId=3¤tPage=1&pageSize=12
- /rule?currentPage=1&pageSize=12&selectorId=1350069791219036160
我们追踪到对应的源码可以看到:
1 | /** |
前两个请求其实是在加载我们右侧的选择器,现在我们没有创建选择器,所以什么也没有。
而 /rule 这个请求是在查询现有的规则列表。
点击右侧的“创建选择器”按钮来创建选择器:
创建好选择器后,由于我们仅仅是把选择器的数据存放在了 数据库中(根据你配置可能在 MySQL 或 H2里),我们如果需要他即时生效需要点击同步自定义rewrite。
接口调用路径是
1 | http://localhost:9095/plugin/syncPluginData/3 |
返回 “sync success”,我们再次切换到源码:
发现 soul-admin 用到了Spring 中的 ApplicationEventPublisher,在如下路径的类中,我们也找到了soul-admin处理这些时间的逻辑:
1 | org/dromara/soul/admin/listener/DataChangedEventDispatcher.java |

刚刚我们应该是通过点击按钮触发了 “onPluginChanged” 这个事件,可以看到,根据我们所配置的数据同步侧录额,soul 提供了三种实现方式:
WebSocket
在 WebsocketDataChangedListener 中调用 onPluginChanged 方法来向 SoulBootstrapApplication 发送JSON序列化后的消息。Nacos
如果配置 Nacos 进行同步,则是通过 ConfigService 来发送消息。1
2
3
4
5
6
7
8
9
10
11
12
13
14
15
16
17
18
19
20
21
22
public void onPluginChanged(final List<PluginData> changed, final DataEventTypeEnum eventType) {
updatePluginMap(getConfig(PLUGIN_DATA_ID));
switch (eventType) {
case DELETE:
changed.forEach(plugin -> PLUGIN_MAP.remove(plugin.getName()));
break;
case REFRESH:
case MYSELF:
Set<String> set = new HashSet<>(PLUGIN_MAP.keySet());
changed.forEach(plugin -> {
set.remove(plugin.getName());
PLUGIN_MAP.put(plugin.getName(), plugin);
});
PLUGIN_MAP.keySet().removeAll(set);
break;
default:
changed.forEach(plugin -> PLUGIN_MAP.put(plugin.getName(), plugin));
break;
}
publishConfig(PLUGIN_DATA_ID, PLUGIN_MAP);
}ZooKeeper
通过节点同步数据。1
2
3
4
5
6
7
8
9
10
11
12
13
14
15
16
17
public void onPluginChanged(final List<PluginData> changed, final DataEventTypeEnum eventType) {
for (PluginData data : changed) {
final String pluginPath = ZkPathConstants.buildPluginPath(data.getName());
// delete
if (eventType == DataEventTypeEnum.DELETE) {
deleteZkPathRecursive(pluginPath);
final String selectorParentPath = ZkPathConstants.buildSelectorParentPath(data.getName());
deleteZkPathRecursive(selectorParentPath);
final String ruleParentPath = ZkPathConstants.buildRuleParentPath(data.getName());
deleteZkPathRecursive(ruleParentPath);
continue;
}
//create or update
upsertZkNode(pluginPath, data);
}
}可以通过对指定接口发起 POST 请求来注册其他语言的服务:
1
2
3
4
5
6
7
8
9
10
11
12
13
14{
"appName": "xxx", //应用名称 必填
"context": "/xxx", //请求前缀 必填
"path": "xxx", //路径需要唯一 必填
"pathDesc": "xxx", //路径描述
"rpcType": "http", //rpc类型 必填
"host": "xxx", //服务host 必填
"port": xxx, //服务端口 必填
"ruleName": "xxx", //可以同path一样 必填
"enabled": "true", //是否开启
"registerMetaData": "true" //是否需要注册元数据
}
请求地址:http://{ip}:{port}/soul-client/springmvc-register 请自行输入soul-admin 的 IP 和 PORT在 postman 或其他工具中成功注册服务:

但我们发现并不能直接通过 soul 来代理我们的 flask 服务:1
2➜ ~ curl http://localhost:9195
{"code":-107,"message":"Can not find selector, please check your configuration!","data":null}%仔细查看文档后,发现需要先设置 Divide 插件并添加对应的selector。

配置完成后可以看到 divide 插件成功选取到了 我们配置的 test1 selector,但是我们的请求1
curl http://localhost:9195/foo/bar/
被解析成了 http://127.0.0.1:5000/bar/,一定是什么地方出了问题。
再看看源码
我们发现 在 org/dromara/soul/plugin/divide/DividePlugin.java 这个类中 buildRealURL 会将我们的 “/foo” 识别为 module,然后把“/bar” 识别为真实的request path,所以导致了刚刚的问题。
再次尝试在前面加一层,成功了。1
2➜ ~ curl http://localhost:9195/1/foo/bar/
Hello World!%
ARTS-04
Algorithm
无重复字符的最长子串(3)
解法1:
1 | import java.util.HashSet; |
暴力破解法没啥好说的, 直接超时了, 显然是不可行的.
时间复杂度:O(n^3)
解法2:
1 |
ARTS-03
Algorithm
Add Two Numbers(#2)
1 | /* |
这道题我们可以创建一个辅助节点pre 再用一个节点cur指向我们正在进行计算的结果链表上的节点。
通过对l1, l2这两条链做遍历,我们可以获得l1, l2 当前节点的值x 和 y,可以计算出他们与进位标识(变量carry,初始值为0)的和sum。可以通过对carry被10整除的余数来得知当前节点的两数相加是否进位。通过对sum的值对10取mod,可以得到加了进位后的值。
之后就是创建辅助节点链的后一个节点,并把cur指向新节点。如果这次运算有进位,则再新增一个值为carry的节点。 这样重复直到l1 或 l2到达链尾,如果不同时到达链尾,则结果链表依次把未到达链尾的数复制,最后l1,l2都到达链尾,计算结束。
Reading
Python at Netflix
https://medium.com/netflix-techblog/python-at-netflix-bba45dae649e
这篇文章主要介绍了Python在Netflix技术架构中的应用。给想要用Python搞事情的朋友们一些有事实支持的思路。
Tips
本周分享一下Java内存模型的happen before原则
- 程序次序规则:在一个线程内,按照程序代码顺序,书写在前面的操作happens before于书写在后面的操作。准确地说,应该是控制流顺序而不是程序代码顺序,因为要考虑分支、循环等结构。如果在一个线程的操作,那么前一个操作的结果必定对后续操作可见。
- 管程锁定规则:一个unlock操作happens before于后面对同一个锁的lock操作。这里必须强调的是同一个锁,而”后面”是指时间上的先后顺序。最常见的就是syncronized 方法和syncronized代码块。
- volatile变量规则:对一个volatile变量的写操作happens before于后面对这个变量的读操作,这里的”后面”同样是指时间上的先后顺序。该规则在ConcurrentHashMap 中读操作不需要加锁中有很好的体现。
- 线程启动规则:Thread对象的start()方法happens before于此线程的每一个动作。
- 线程终止规则:线程中的所有操作都先行发生于对此线程的终止检测,我们可以通过Thread.join()方法结束、Thread.isAlive()的返回值等手段检测到线程已经终止执行。
- 线程中断规则:对线程interrupt()方法的调用先行发生于被中断线程的代码检测到中断事件的发生,可以通过Thread.interrupted()方法检测到是否有中断发生。
- 对象终结规则:一个对象的初始化完成(构造函数执行结束)先行发生于它的finalize()方法的开始。
传递性:如果 A happens before B,且B happens before C,则A happens before C
Share
打造 Mac 下高颜值好用的终端环境
https://blog.biezhi.me/2018/11/build-a-beautiful-mac-terminal-environment.html
ARTS-02.md
Algorithm
Print in Order(1114)
1 | Suppose we have a class: |
解题思路:
leetcode关于多线程的新题,考察多线程中的按序执行。
可以用以下方法解:
- 利用CountDownLatch 来控制执行的顺序。
- 利用volatile 创建全局可见的变量,通过对该变量的原子性更新来保证执行顺序。
1 | import java.util.concurrent.CountDownLatch; |
1 | class Foo { |
Reading
Faircode, an alternative to Open Source that aims to get developers paid
https://hackernoon.com/faircode-an-alternative-to-open-source-89cdc65df3fa
在2017年作者提出了Faircode这个概念,旨在给开发者一个新的盈利方式。不同于“闭源软件”,Faircode 打算以向大公司收费而对小公司免费的形势获利。然而不幸的是,作者发起的Faircode 及相关的license 已经被删除了。作者想法在当时比较前卫,可能在推行的过程中成效不大吧。
Tip
https://javarevisited.blogspot.com/2018/05/10-tips-to-become-better-java-developer.html
Share
JAVA 注解的基本原理
Java 中接口与抽象类的区别
抽象类:
定义:
如果一个类有抽象方法,则称这个类为抽象类。使用abstract修饰抽象类。
抽象类中可能含有无具体实现的方法,故不能用抽象类创建对象。抽象方法是一种特殊的方法,只有声明,没有实现。如果一个类继承抽象类,则必须实现父类的抽象方法,如果不这么做,则此类也应该为抽象类。
抽象类与普通类的区别
- 抽象方法的访问修饰符必须为public 或者 protected(如果为private 则不能被子类继承,子类无法实现该方法),默认为public。
- 抽象类不能用来创建对象。
- 如果一个类继承于一个抽象类,则子类必须实现父类的所有抽象方法。如果子类没有实现,则必须定义为abstract class。
接口
可以含有变量和方法。
但是接口中非default的方法是隐式抽象的,接口中的方法会被隐式的指定为 public abstract(只能是 public abstract(1.8以后可以是default),其他修饰符都会报错)。
接口中可以含有变量,但是接口中的变量会被隐式的指定为 public static final 变量(并且只能是 public,用 private 修饰会报编译错误)。
抽象类和接口的区别
- 抽象类中的方法可以有方法体,就是能实现方法的具体功能,但是接口中的方法不行。(Java 1.8以后接口可以有可以实现的default方法)
- 抽象类中的成员变量可以是各种类型的,而接口中的成员变量只能是 public static final 类型的。
- 接口中不能含有静态代码块以及静态方法(用 static 修饰的方法),而抽象类是可以有静态代码块和静态方法。
- 一个类只能继承一个抽象类,而一个类却可以实现多个接口。
ARTS-01
Algorithm
Two Sum 两数之和(leetcode #1)
“平生不识 TwoSum,刷尽 LeetCode 也枉然。”
1 | Given an array of integers, return indices of the two numbers such that they add up to a specific target. |
解题思路:
本题的要求是找到两数之和等于 target 的以这两个数的下表为元素的数组,初步的想法应该用HashMap 存下遍历 nums数组的下表与对应的值,并且判断当 用target减去 已存在的数得到数组中另一个数时,满足题目的要求,返回他们的下标。
1 | class Solution { |
Reading
Top Signs of an Over-Experienced Programmer
https://medium.com/better-programming/top-signs-of-an-over-experienced-programmer-22bbe0b57663
只要我们还是programmer 我们的重心还是要放到programming 与 engineering 上,过度地考虑需求是否合理,项目是否能满足用户需求等并不是我们需要考虑的重心。我们需要避免不必要的refactoring,以尽可能perfect地实现需求为目标,深入到code engineering才是。
Tip
本周在做新项目时又重新用到了 hibernate mybatis 和 jdbcTemplate。下面针对这些工具我个人的一些看法
- hibernate 虽然比较方便,结合Spring Data JPA 可以非常方便的写出crud逻辑,但缺点也非常明显,就是相对其他两个来说太不灵活了,如果不小心开启了自动生成数据库的配置,自动生成的外键够让你难受的了。
- mybatis 使用起来中规中矩,但还是不够灵活,仿佛掉进了维护数据表间关系的坑里。
- jdbcTemplate 我用得最顺手,特别是 NamedParameterJdbcTemplate,通过手动拼接SQL实现复杂的逻辑非常好用,还不必像在PreparedStatement中一样数问号🤣
Share
本周分享的文章是来自 阿里云云栖社区 的一篇关于HashMap的文章
由阿里巴巴Java开发规约HashMap条目引发的故事
https://zhuanlan.zhihu.com/p/30360734
Java Exception & Error
###java.lang.ClassNotFoundException
This exception indicates that the class was not found on the classpath. This indicates that we were trying to load the class definition, and the class did not exist on the classpath.
###java.lang.NoClassDefFoundError
This exception indicates that the JVM looked in its internal class definition data structure for the definition of a class and did not find it. This is different than saying that it could not be loaded from the classpath. Usually this indicates that we previously attempted to load a class from the classpath, but it failed for some reason - now we’re trying to use the class again (and thus need to load it, since it failed last time), but we’re not even going to try to load it, because we failed loading it earlier (and reasonably suspect that we would fail again). The earlier failure could be a ClassNotFoundException or an ExceptionInInitializerError (indicating a failure in the static initialization block) or any number of other problems. The point is, a NoClassDefFoundError is not necessarily a classpath problem.
Vue.js双向数据绑定探究
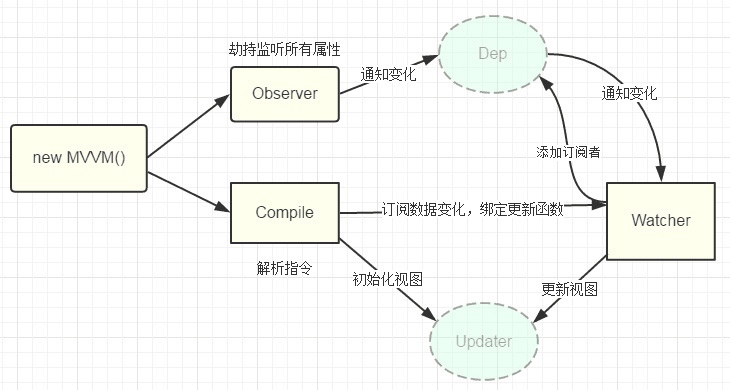
在最近的前端面试中,vue.js的双向数据绑定基本是我必问的。下面我们就一起探究下其原理。

- 原理
Vue.js双向数据绑定的原理主要是通过 Object对象的defineProperty方法,重写data的set和get函数 来实现的。
以下是defineProperty()的语法这个方法的三个参数分别是:1
Object.defineProperty(obj, prop, descriptor)
- obj
要在其上定义属性的对象。 - prop
要定义或修改的属性的名称。 - descriptor
将被定义或修改的属性描述符。
方法相关的就不在这里讨论,详见:
https://developer.mozilla.org/zh-CN/docs/Web/JavaScript/Reference/Global_Objects/Object/defineProperty